If you want this pattern, it's available as a pay-what-you-wish PDF and KXStitch download on itch.io
My friend made a cross-stitch piece, and it's been generating a surprising amount of enthusiasm!
 |
Cadmus the corn snake with his portrait
|
(shameless reddit plugs
one,
two,
three)
While you will have to talk to /u/rip_in_pepperinos about the final steps of sampling points (digitally doable, see my blackwork post), picking thread closest-colors, adding text, and ultimately sewing the piece (around 30 hours of stitching!)... converting from a photo or drawing to a pixel-art proto-pattern is relatively straightforward.
(10 min – 1 hr process, depending on how familiar you are with the tools)
Method Recipe (each step links to sections of this blog post):
1. Resize image to desired DPI and stitch-pattern size (Cadmus was 25 DPI, 300 px (6 in) length)
2. Posterize image to desired number of colors
3. (optional) Use hue/saturation adjustment and magic wand tool to recolor image to your desired color palette
4. (optional) Other quality-of-life things that you can do to be more kind to the sewer / pattern-maker
 |
| Original drawing using six markers (plus white paper) |
 |
Finished pixel-art using eleven colors
(plus some extra colors from digital artifacts, which I did not fix but you can! Will be addressed later in this post) |
Note: the original marker drawing for the Cadmus pattern, although being a quick sketch, is something I am extremely uninterested in responding to and redrawing by commission. Art requires practice and emotional labor, and monetizing art is an actual job. If you came here looking for someone to create a custom drawing of your beloved pet from a photo, go find a professional artist whose style you like and pay their posted price. I guarantee you that they are making below minimum wage for the hours and labor required for them to pursue their passion. If you want your photo to look more like a drawing / painting but find art difficult, don't lose hope! Both the pixelating process and some style plug-in programs that I mention later in this post mimic some painting-like abstractions and only require artistic taste, not technique.
You will need a graphics editor software with the ability to resize an image, adjust brightness/contrast, a "magic wand" select-by-color tool with adjustable tolerance, a "paint bucket" fill-selection tool, and a paint palette that allows you to enter HEX values and save custom colors. These are all tools that any basic, free graphics program will have (popular multi-OS programs include Inkscape and GIMP). For this application, you will probably want a program that already includes a "Posterize Effect", which automatically reduces the number of colors in an image (commonly used to produce graphics for posters). There are free website-based tools that will do this for you if your graphics program doesn't have it by default. It's also nice, but not necessary, to use a program with image layer functionality. Throughout this post, I am using Paint.Net, a free program for Windows.
Basically, our goal is to convert a high-resolution, many-color image to a low-resolution, few-color one. At minimum, we first use the resize function to achieve pixelation and limit spatial resolution then use the posterize function to limit colors.
 |
| Left to right: Original stock image photo, Resized and zoomed in, Posterized, Re-tinting and changed color saturation (optional). Click on this image to see full-sized pixelation view! |
However, we can play with our graphics software and give the photo some artsy effects before using this pipeline. Any basic digital effect that either lowers resolution (blurs, outlines, brightness and contrast adjustment) or removes color variation (convert to grayscale or sepia, convert to binary black/white, adjust hue or saturation, adjust brightness or contrast) is useful to us.
Many programs support free plugins from community members. Here, I take the original stock photo and use BoltBait's "Pastel Effect" to get a watercolor style that both blurs and reduces color variety in the image.
 |
| Boltbait's 'Pastel Effect' with Size value 5 and Roughness value 255 |
Most graphics programs will include a range of image adjustment and effects options by default, and these go a long way towards making a photo look like an artistic rendering. Learn to love 'Undo' buttons and make some art!
 |
Boltbait's Pastel Effect (see previous image)
Hue/Saturation adjusted to -103 to get a green/purple color scheme.
Brightness adjusted to -75 and contrast to 50 to amplify watercolor effect.
Ink Sketch effect applied with Outline value 75 and Coloring value 100.
|
Consider this "watercolor" version. At this point, we have taken a fairly-detailed image of two human hands holding hands and reduced the colors to just purples, blues, greens, and black. We have captured most of the highlights and shadows as well-defined blocks of color, and have simplified most of the shapes in this image without making the hands unrecognizable — all of this before even starting the stitch-pixelation routine.
I'll walk through the pipeline steps with both the original hands-stock-image (called "Photo" going forward) and the recolored green/purple (called "Painting") to further highlight how stylistic changes carry forward into pixelation.
Step 1: Resize image to desired DPI and stitch-pattern size (and take advantage of screenshots)
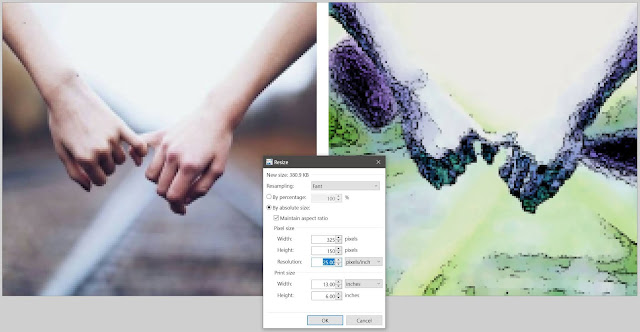 |
| Most image-resize functions allow you to change image resolution and width/height. For our purposes, the actual resampling algorithm used by the graphics editor is unimportant. |
Many graphics programs have a hard time forcing image elements to adhere to strict grid systems. If your program has a snap-to-grid feature and a pixelate distortion function (not uncommon, but mine does not) then you can achieve the same effect with those methods.
This method forces the graphics editor to use a grid system by limiting the number of pixels available to it (and then you can still save a high-resolution image by taking a screenshot of your display)
The "Resize Image" function (sometimes called "Scale Image") is usually in the "Image" sub-menu. You will want to change the image resolution to your desired pattern resolution (25 Dots Per Inch is common). The width and height setting will define how big the final pattern is. You will also want to make any compositional changes (such as cropping image to change where the center point is) at this time.
After you've resized your image, maybe you want your piece to use even larger pixel blocks. You can continue reducing the resolution if you like; just keep in mind that your image pixel dimensions (length and width) need to evenly divide by whatever resolution you are picking. Some graphics programs let you specify units in the resize menu so you don't have to do arithmetic, but if not... be careful!
Step 2: Posterize image to desired number of colors
This is the main step. At this point, you have an image in the approximate visual style that you're going for, and all you need to do make the image not require infinite colors. This means that you have outlines, highlights, and shadows where you want them (although you definitely can add these by hand later).
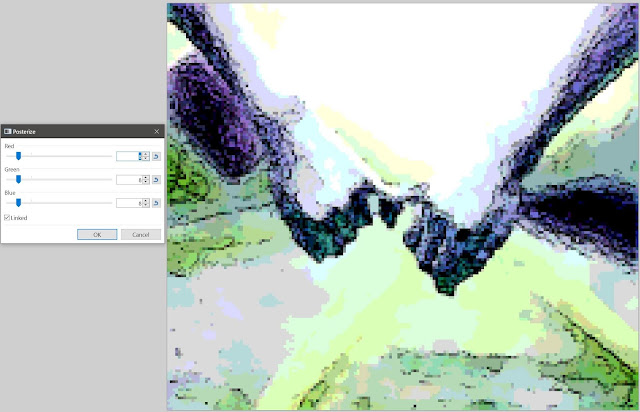
The "Posterize" filter recolors an image using a specified number of colors. It will use a Nearest-Neighbors algorithm to find a set of colors that best match the original image. In Paint.Net, the settings give you control over the maximum number of RGB values available to the algorithm.
A quick go-over of simplified digital color theory: Light that comes from your computer screen is made from Red, Green, and Blue light additively mixing, so colors are defined by RGB "channels". White is maximum values of all channels. Black is no light of any color (not actually true, but this is simplified color theory). Pure Red is just that with no Green or Blue. One bit (unit of data) of Red will be pure red. More bits in the Red channel will increase the numbers of levels of intensity (more subtleties in color) the computer screen will display. Behind the scenes, Paint.Net is taking your specified number of colors per RGB channel and thresholding the RGB bits defining the colors it is showing you.
In Paint.Net, each color channel normally has up to 256 possible values (0 through 255). The posterize tool lets you limit from 2 to 64. The total maximum number of colors your image will have is the multiplication of each color channel's threshold (so limiting to 8 values per channel, as below, forces a maximum of 512 color possibilities). The additional requirement of attempting to match original colors makes the below image contain significantly fewer than 512 colors.
 |
Photo with RGB thresholds each set to value 8, such that image is limited to 512 possible colors.
|
You might be wondering what the "linked" checkbox is for. Typically, to maintain an average adherence to the original color scheme you would want the same thresholds for the RGB channels. But maybe you wouldn't mind a rosier image, as in below. If you limit the red hues more than green or blue, the algorithm has fewer shades of red available and overall saturation of reddish components become more intense (sorta counter-intuitive that decreasing red threshold value increases output redness).
 |
| Less of the forearm and backs of hands contain the greenish shading component when R channel is set to value 6 (G and B channels remain at value 8). |
 |
If your image is color-limited to begin with, Posterize filters have less of an effect.
|
 |
It is possible to apply the Posterize filter more than once. Eventually reduction in numbers of colors ends and you only see changes in color saturation.
|
(If you like the posterize idea but having to select RGB channel values bug you, Paint.Net forums have various other implementations (
link 1,
link 2) of the idea using Hue/Saturation/Value bands (HSV). There are also a number of browser tools that you can pop your image into and manually select a color palette - I would recommend using a full-resolution screenshot of your pixelated image)
At this point, you now have a perfectly viable pixel-art piece. In fact, for the Cadmus piece I stopped here and passed it on for use as a pattern — this worked out great! However, there was a fair bit of work between having the Cadmus pixel art and getting a feasible cross-stitch pattern. Much of this work can be avoided with minimal extra effort on the pixel-art generator side.
 |
| You could just get the thread colors and stitch based on this, but you can do better |
Here, we learn from my initial mistakes and strive to be better. A side takeaway from this post is an example of someone making a tool for someone else to use, but not being familiar enough with the use cases to imagine and include all of the obvious useful features.
Critical feedback is a nice thing! This pipeline might get some update posts of additional features that would be useful or current features that seem to be unnecessary.
Step 3: Recolor image to match thread colors that actually exist
Paint.Net's posterize function tries to find a palette that closest-matches the current image, subject to your specified number-of-colors restriction. It won't necessarily use colors that actually exist in thread (some programs' posterize tools let you specify a list of colors, in which case you've already done this step). For this, you will appreciate applying your changes in a different layer so you can see which sections of the image have been recolored by toggling layer visibility.
This step makes heavy use of the Magic Wand tool, which selects areas of an image based on color. When you click on a pixel with this tool, it will select all other pixels (we are using Global mode; you can also use it in Contiguous mode to only select neighbors) that are similar in color based on a threshold value. The threshold value is the key variable: below are two selections of black pixels (shown as red here for contrast) with threshold values set to 30 and 60, respectively.
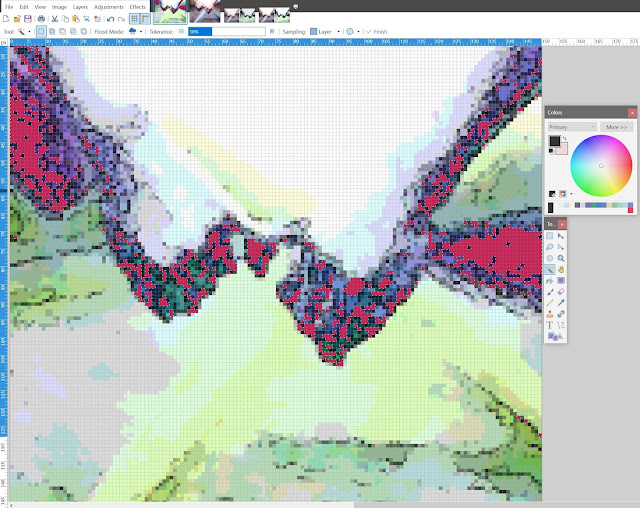 |
| A threshold value of 30 misses many pixels that should be colored black |
 |
| A threshold value of 60 nearly wipes out the purple-blue color gradients |
Most of your threshold values will be in the 10 to 40 range, depending on how subtle your desired coloring is. Again, learn to love the Undo feature.
Once you have a selection boundary, you can recolor it (Paint Bucket or Fill tool, again with a Global setting). In particular, you can specify the new color using a Hex code that you extracted from a thread picker database.
 |
| Most programs allow you to select a color by colorwheel, RGB, Hex, and HSV |
This step can be a pain, but it does guarantee you full control over color selection and colorblock contours. If preserving graininess doesn't matter, you can handwave away much of this and just let your (or your patternmaker's) brain interpolate reasonable color boundaries.
 |
| Can you spot the differences between the posterized version and the recolored version? |
 |
| Color palette used for all pixels in final Watercolor Painting pixel-art |
We're done! Remember to send screenshots and not direct copies of your pixel-art, as compression outside of your image-editing software will make a zoomed out version of your 150 x 150 pixel image look very blurry. However, you should also remember to save your working-copy as-is, since any future changes on a not-downsampled image will be difficult.
Step 4: Extra quality-of-life things like toggling grids and rulers, landmark lines
Paint.Net's default toolbar includes toggles for viewing the XY side-rulers and pixel gridlines. Usually the gridlines are useful, but if you wanted to port your image to a cross-stitch pattern generator (ours used
KXStitch for Linux, but
there are others) the gridlines are likely to cause unwanted image artifacts.
I also didn't anticipate that the sewer would want to see the side rulers once given a pixel-gridlined PDF, but in retrospect this is an obvious feature to include when you're sending complicated digital images to someone.
 |
| Watercolor painting with rulers, minus pixel grid |
It also would be useful to include midpoint lines in a contrasting color (for your sanity, put this in a separate layer from the art) and other landmarks as needed.
 |
| Watercolor painting with ruler and red midpoint-landmark lines |


No comments:
Post a Comment